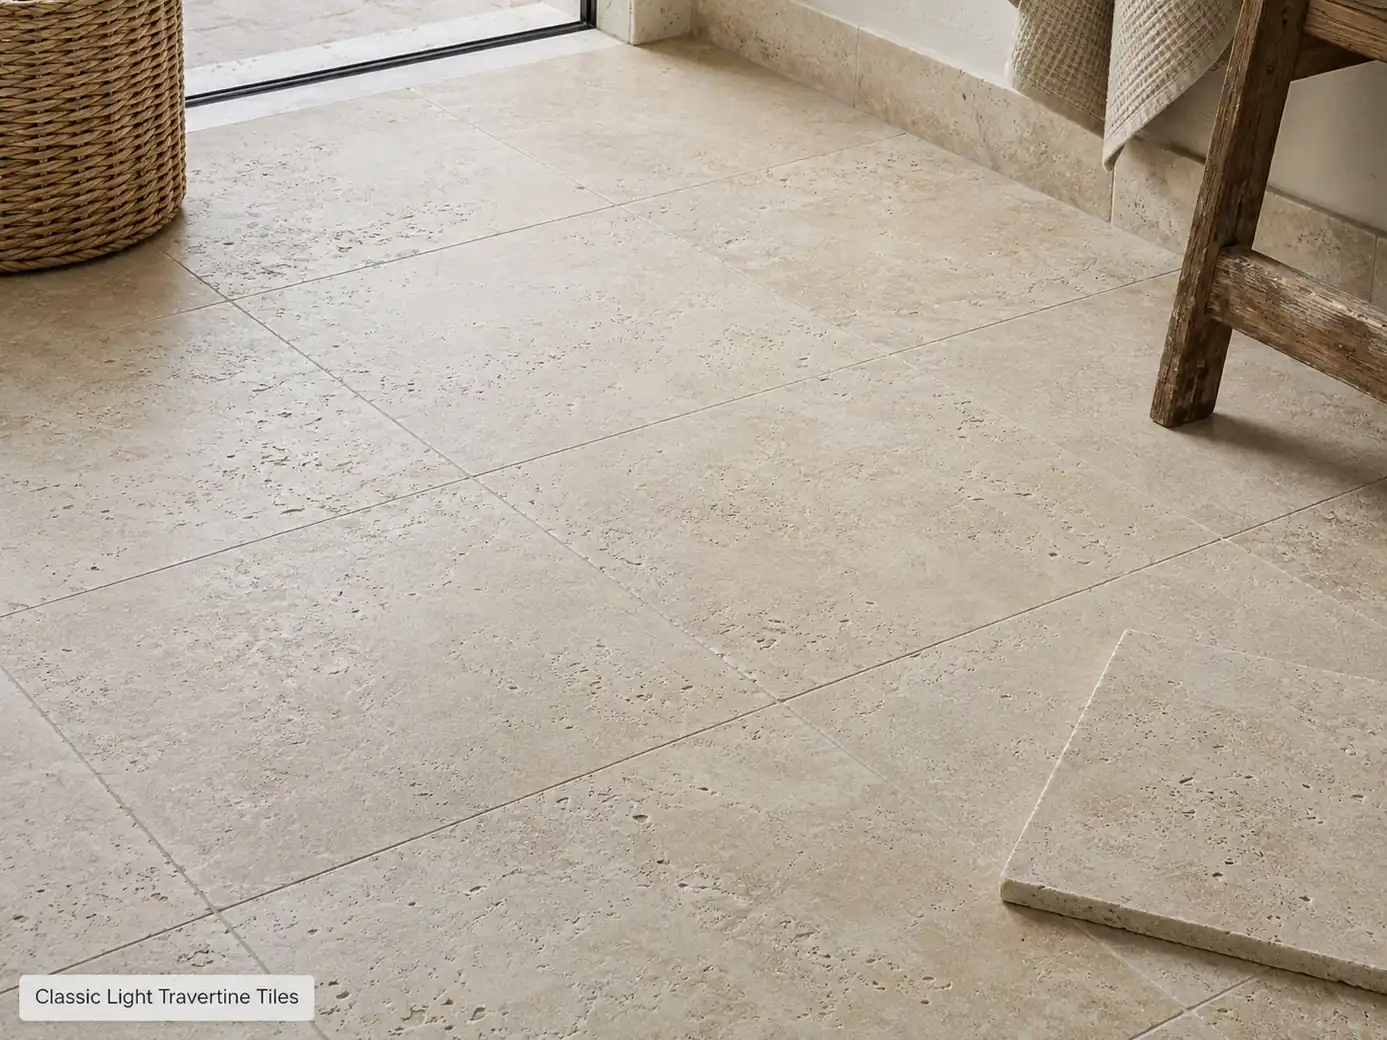
Travertine tile is available in formats including 4×4, 3×6, 12×12, 16×16, 12×24 and 18×18, plus mosaics and pavers. Travertine floor tile and travertine tiles bathroom applications are possible when the finish suits wet use; polished stone can become slippery when wet. Filled travertine has its natural voids filled for a smoother surface, while unfilled stone keeps them open. Honed, brushed, tumbled, split-face and other finishes are available, and periodic sealing may be recommended.
Versatile Travertine Surface Solutions
Travertine Tiles Small
Secure product inquiry
Buy now
Cash on delivery available. Product details are pre-filled below. Owner delivery adds AED 5,000.
Finish, Seal & Wet-Area Use
Filled vs Unfilled: Finish and Slip Considerations
Filled travertine creates a smoother surface by closing natural pores, while unfilled stone retains more of the material’s characteristic cavities and texture. Finish also changes performance: honed surfaces suit many interiors, while tumbled or brushed textures are often preferred where additional grip is needed. For wet areas, slip performance should be assessed for the specific tile, and consistent project quantities should be selected from compatible batches to manage natural shade variation.
Natural Surface System
Classic Light Travertine Floor and Wall Tiles
These Classic Light Travertine Floor and Wall Tiles use a 30 × 30 × 1.2 cm honed format that brings natural ivory-beige travertine into smaller-scale interior applications. The square dimensions make the tile suitable for selected floor layouts, wall surfaces and bathroom schemes where a consistent modular format is preferred. Its honed surface reduces the reflective appearance associated with polished stone while retaining the natural variation of travertine, allowing floors and walls to read as genuine limestone surfaces rather than uniform manufactured coverings.
Tile Selection
How to Specify Travertine Stone Tiles
Specify these 30 × 30 × 1.2 cm travertine tiles according to the installation rather than format alone: wall, dry-floor and wet-area uses place different demands on finish and fixing. Before installation, compare pieces from the same batch for tone, pore pattern and natural movement, then blend boxes where necessary so variation is distributed intentionally rather than appearing as isolated patches.
Choose the Right Travertine Tile Surface
Filled travertine closes natural pores for a smoother, easier-clean surface, while unfilled stone deliberately retains its open cavities and stronger texture.
Select Honed or Textured Floor Stone
Honed, brushed and tumbled finishes offer different textures, with wet-area use requiring verified slip performance rather than relying on finish names alone.
Compare Vein-Cut and Cross-Cut Travertine
Vein-cut travertine produces long linear movement, while cross-cut pieces reveal a softer clouded pattern across the tile face.
Product Data
Classic Travertine Tile Product Details
These small-format tiles use honed Classic Light Travertine in a light ivory-beige tone. Each tile measures 30 × 30 × 1.2 cm and weighs 2.7 kg, giving a 12 mm natural-stone format suitable for layouts where the selected finish and installation system match the intended use.
| Calibrated Thickness Tolerance | ±0.5 mm calibrated thickness tolerance |
|---|---|
| Rectified Edge Option | Rectified/sawn-edge option suitable for approximately 2–3 mm controlled joints |
| Joint Width Recommendation | 2–3 mm grout-joint width for calibrated sawn-edge interior installation |
| Backing Mesh Option | Optional alkali-resistant fibreglass mesh backing, factory-bonded with stone-compatible epoxy for added handling strength |
| Shade Variation Grade | V3 substantial natural shade variation; dry-lay and blend pieces from multiple boxes before installation |
| Breaking Strength | Minimum 1,000 N average breaking load for the 300 × 300 × 12 mm tile format |
| Water Absorption | Maximum 3.0% water absorption by weight when tested in accordance with ASTM C97 |
| Frost Resistance | Frost resistance verified for 48 freeze–thaw cycles under EN 12371 with no visible cracking or material loss |
| Adhesive Bed Requirement | White natural-stone adhesive installed as a continuous full bed with back-buttering and minimum 95% coverage |
| Grout Joint Compatibility | Compatible with 2–3 mm grout joints using unsanded or fine-aggregate grout approved for natural stone |
Project Sizing
Custom Travertine Floor Tile Options
Travertine tiles can be supplied in standard 30 × 30 cm formats or project-cut dimensions for floors, walls, borders and coordinated mosaics. Select the required shade range before production, especially where multiple crates will cover one continuous area, and approve representative samples showing the expected colour, pores, fill and veining rather than judging the order from one unusually uniform piece.
Application Flexibility
Where to Use Natural Travertine Tiles
Natural travertine tiles work well across villa floors, entrance areas, bathroom walls, selected bathroom floors, feature walls and other interior surfaces where a genuine stone finish is required. Different formats and surface treatments allow the material to be adapted to dry living spaces, wet areas and decorative applications rather than using one finish for every location.
- Interior Floor Areas
Honed travertine tiles suit living rooms, hallways and other interior floors where a natural stone surface is required.
- Bathroom Wall Surfaces
Honed travertine tiles provide a smooth natural-stone finish for bathroom walls when installed over suitable substrates.
- Outdoor Textured Options
Brushed, tumbled or other textured travertine finishes can be specified for outdoor areas where added surface grip is preferred.
- Custom Project Sizes
Tile dimensions can be cut or ordered in project-specific formats to suit floor patterns, walls, borders and architectural layouts.
Installation & Care
Installing and Maintaining Travertine Tiling
Install travertine only over a sound, properly prepared substrate, select grout and joint widths appropriate to the tile format, and specify a finish with suitable slip performance for wet or exposed areas. Seal according to stone absorption, maintain with pH-neutral cleaner and retain spare tiles from the same production batch for future replacements because natural tone can vary; an airbnb interior design consultant should likewise account for replacement practicality in high-use interiors.

Technical Specification
Travertine Tile Specifications
Use the tile specifications to confirm the cut, filling status, slip intent and installation requirements before selecting these pieces for a particular floor or wall application. These fields are especially important where substrate conditions, moisture exposure or foot traffic affect how the travertine should be installed.
Product details
Specifications, care, delivery and FAQ
Everything is rendered from product JSON fields so the page remains SEO-ready even before JavaScript runs.
Cleaning: Vacuum using a soft-floor attachment, damp-mop honed tiles with diluted pH-neutral stone cleaner, change dirty water frequently, rinse residue and dry high-traffic areas, clean grout with a stone-safe soft brush, avoid vinegar bleach abrasive powders and unapproved steam cleaning
Daily Care: Vacuum abrasive grit daily with a soft-floor head, wipe spills promptly, damp-mop with diluted pH-neutral stone cleaner, keep grout and joints dry and clean, use entrance mats in traffic areas, avoid acids abrasive pads and waxy residue
- Avoid installing visibly varied tiles without dry blending
- avoid acidic cleaners
- avoid abrasive grit remaining underfoot
- avoid excessive wetness on unsuitable substrates
- avoid sealing or grouting before the installation is fully dry
Maintenance: Vacuum grit using a soft-floor attachment, damp-mop with diluted pH-neutral stone cleaner, clean grout with a soft nylon brush, repair reopened holes promptly, inspect joints and sealant, reseal only when absorption testing indicates
Handling: Carry cartons flat and fully supported, keep boxes dry and upright as marked, lift individual tiles with two hands, protect corners from impact, dry-lay and blend several boxes before installation, use suction lifters for larger formats
Which grout colour will blend best with the natural ivory-beige shade variation in these honed travertine tiles without making every joint visually dominant?
A warm ivory, light beige or pale greige grout usually blends best with honed Classic Light Travertine without outlining every 30 × 30 cm tile. Match the grout to the stone’s overall background tone rather than its darkest pores or individual bands, and avoid brilliant white, which can create a grid effect. Test several cured grout samples beside multiple dry and damp tiles because shade variation and sealer can change the result. Use a grout suitable for natural stone that will not stain or scratch the honed surface.
What grout-joint width is appropriate for these 30 × 30 cm honed travertine tiles after accounting for edge calibration and natural dimensional variation?
Calibrated 30 × 30 cm honed travertine commonly uses joints around 2–3 mm, while tiles with greater edge or dimensional variation may require 3–5 mm. Dry-lay and measure several pieces before deciding, follow the installer’s tolerance assessment and avoid joints too narrow to accommodate natural variation and movement.
Can these 12 mm travertine tiles be installed over underfloor heating without causing cracks, loose filling or discoloured joints?
Yes, 12 mm travertine can be installed over underfloor heating when the substrate is stable, the system is commissioned correctly and a suitable flexible adhesive, movement-joint layout and uncoupling strategy are used. Heat must rise gradually only after curing, and loose filler or moisture-sensitive areas should be repaired before installation.
How should Travertine Tiles from several boxes be dry-laid and blended before installation to distribute variations in beige tone, veining and natural pore patterns evenly?
Open tiles from at least four to six boxes simultaneously, sort obvious light, medium and dark pieces and dry-lay a representative area under the final lighting. Rotate and distribute strong veins, pores and tonal shifts without creating clusters or repetitive bands, then number unusual pieces and obtain approval before installation; never install one complete box at a time.
What continuous waterproofing membrane, corner reinforcement and sealed penetration details are required behind travertine tiles in a shower before the stone is installed?
Install a continuous wet-area waterproofing membrane over a stable prepared substrate before laying the tiles, including reinforced internal corners, wall-to-floor junctions and transitions. Seal pipe, mixer and fixing penetrations with compatible collars or liquid-applied detailing, test the waterproofing where required and treat grout and travertine only as finishes—not as the waterproof barrier.
Reviews
Reviews and new review submission
0.0 average rating from 0 reviews. New reviews are saved as pending until approved.
No approved reviews yet for this product. The review form is ready for buyer submissions.